
Custom Fields
Custom fields let you capture extra information beyond the standard fields in Growth Catalyst CRM. You can use them to personalize contact profiles, store key onboarding details, add questions to forms and surveys, or even trigger automations.
Create Custom Fields
Create a Custom Field
- Go to Settings > Custom Fields, and click on the blue + Create Field button in the top right corner.
- Choose the type of field you want to create from the dropdown menu, and select Contact, Opportunity or Business from the Object dropdown menu.
- Add the field Name. If you have a long question, we recommend keeping the field name short and then editing the field title when adding the field to a form or survey.
- Select which Folder you want to add the field to.
- Press Create Custom Field to finish.
You can also create custom fields directly in Forms, Surveys and Opportunities but they can only be edited in Settings.
Click here for more information on using Forms.
Types of Custom Fields
Types of Custom Fields
There are several types of custom fields including :
- TEXT INPUT - Basic options such as Text (one line) and Multi Line (paragraph). If you need to take a list of values, such as initial measurements, you can use Textbox List. For formatted text, such as bold, bullets and links, use Rich Text. For a website address, use URL.
- VALUES - Numerical (number entry), Date and Time, Phone and Monetary.
- MULTIPLE CHOICE - For dropdown menu options, there is Single Options (only one option can be chosen) and Multiple Options (multiple options can be chosen). For a list of options, there is also Checkbox (multiple options can be chosen) and Radio (only one option can be chosen).
- OTHERS - If you want a handwritten signature, to use on something like a membership contract or PARQ, you can use Signature. If you want the contact to upload a document, choose File Upload (allows files to be uploaded (or required) with submission. File types allowed include PDF, DOC, JPG, PNG, GIF and you can specify which of those file types you will accept and whether you want to allow multiple files. If a client tries to upload a file format that is not in the accepted format, they will get an error message.
Once you select the field type, you will be given additional options to choose from. For example, for multiple choice fields you can add your options, and for Checkbox and Radio you can add an image or an icon. For Date and Time you can specify date and time ranges, and for URL you can include or exclude specific domains.
Contact Fields and Opportunity Fields
There are three types of custom fields you can create: contact, opportunity and business fields.
- Contact fields are ideal for storing client-specific details, such as PAR-Q information or onboarding questions. They can be added as questions to forms and surveys, with the answers automatically saved to the client’s contact card.
- Opportunity fields live on the opportunity card inside a pipeline.
Click here for more information about creating and using Opportunity Fields.
Dashboard
Custom Fields Dashboard
Go to Settings > Custom Fields to view existing custom fields. You can filter by object type using the All, Contact, Opportunity and Business buttons at the top. You can also filter by Created, Field Type and Source, and choose which columns to view and change their order.
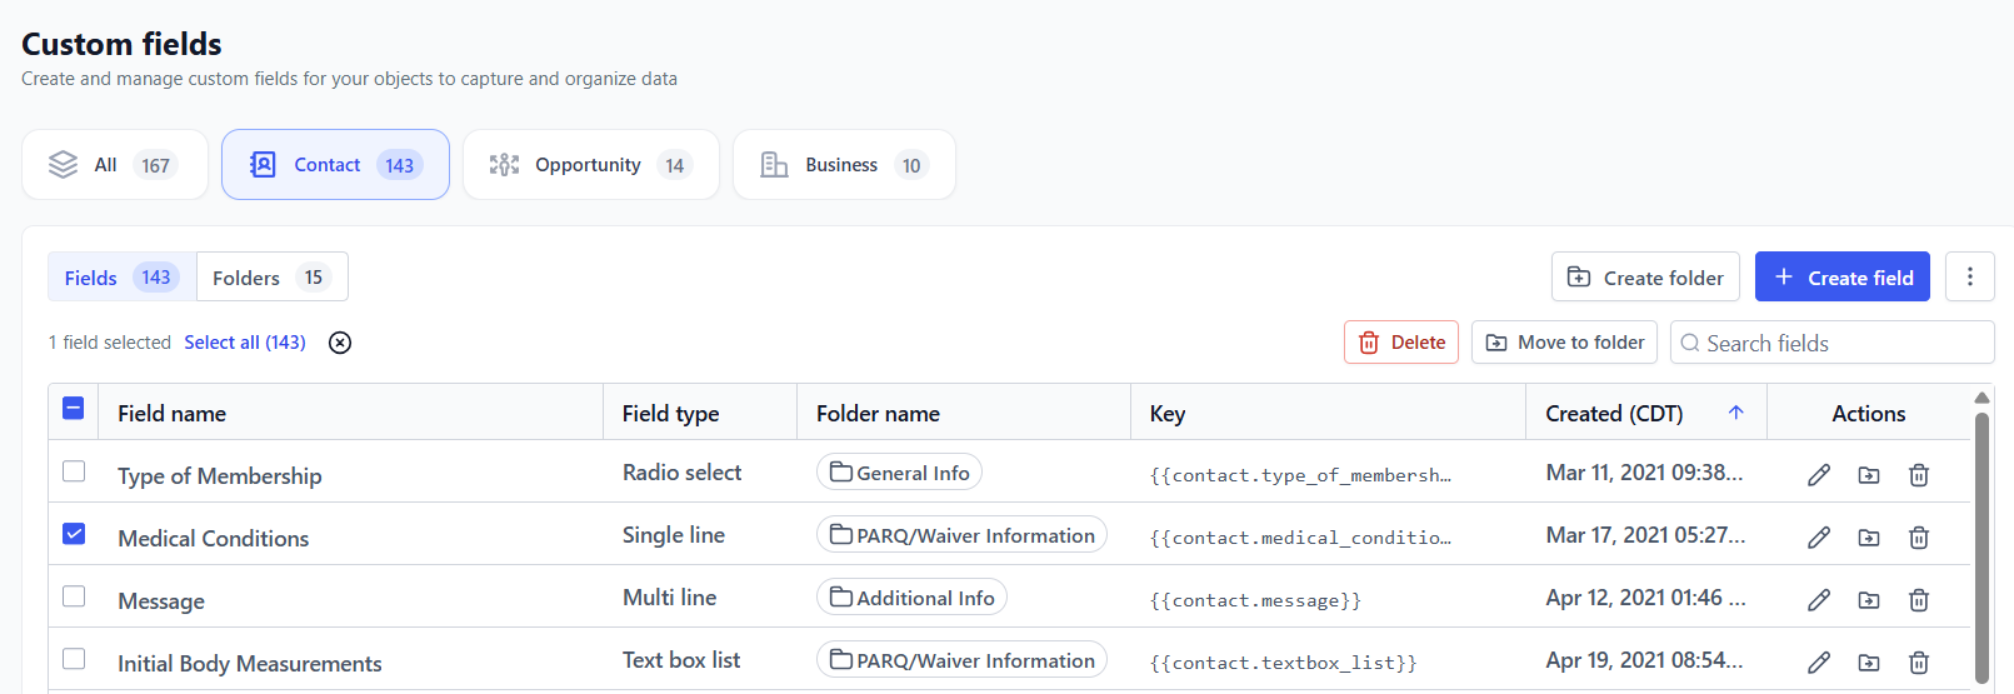
Edit a Custom Field
To edit a custom field, click on the Pencil icon in the Actions column and follow the on-screen instructions. Standard fields, such as name and email address, cannot be edited.
Once you create a custom field, you cannot edit the field type or the object. To change either, you will need to delete the field and create a new one.
Move a Custom Field to a Folder
To move a field to a folder, click on the Folder icon in the Actions column, select the folder from the list and click Move. To move multiple fields, select the fields you want to move and click on the Move to Folder button in the action bar.
Delete a Custom Field
To delete a custom field, click on the Trash Can icon in the Actions column and follow the on-screen instructions. To delete multiple fields, select the fields you want to delete and click on the Delete button in the action bar. Standard fields, such as name and email address, cannot be deleted.
Rearrange Custom Fields
To reorder the fields, click on the Folders tab and select the required folder. Press and hold down the left mouse button on the four grip lines icon next to the field name and drag it to a new position.
The order of the custom fields in Settings is the order they will appear in Contacts or in the Opportunities card (depending on the type of folder). You can also Hide Empty Fields in Contacts by checking the box.
Folders
Custom Folders Dashboard
Go to Settings > Custom Fields > Folders to view existing custom folders. You can filter by object type using the buttons at the top, filter by Created, and choose which columns to view.
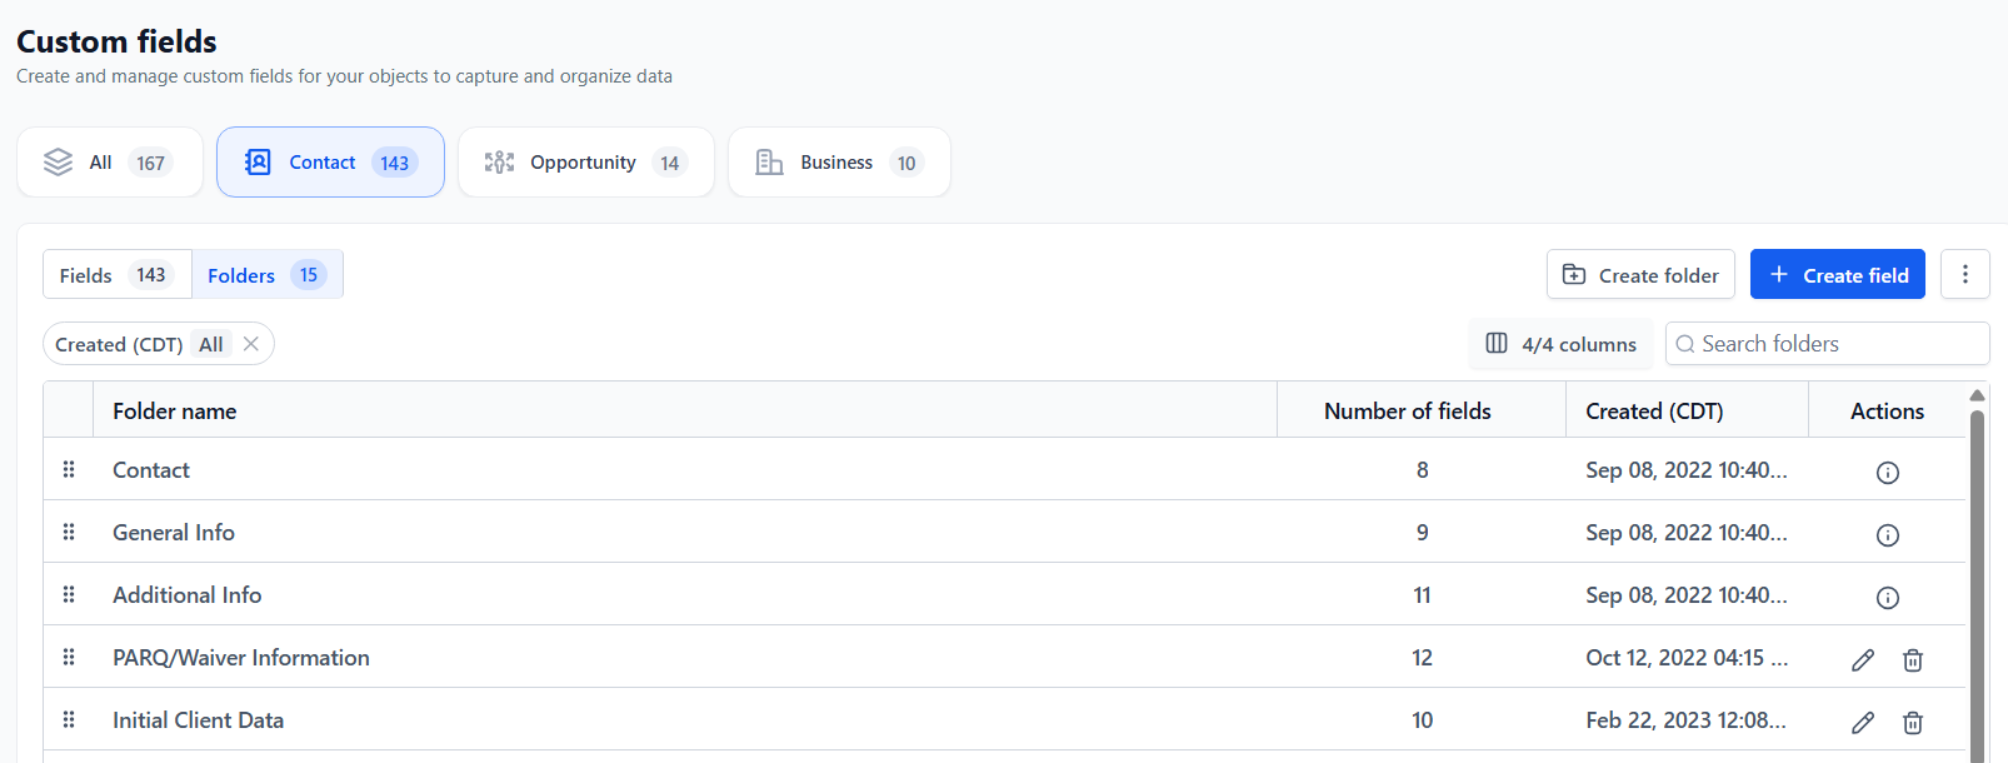
Create a Folder
- Go to Settings > Custom Fields, and click on the white Create Folder button in the top right corner.
- Enter the name of the folder, and select Contact from the Object from the dropdown menu .
- Press Save to finish.
Rearrange Folders
To reorder the folders, click on the Folders tab. Press and hold down the left mouse button on the four grip lines icon next to the folder name and drag it to a new position.
The order of the contact folders in Settings matches the order the sections in the left hand panel of contact cards in Contacts. The order of the opportunities folder is the order of the menus in the opportunities card in Opportunities.
Edit a Folder
To edit a folder, click on the Pencil icon in the Actions column and follow the on-screen instructions. You cannot edit the Contact, General Info or Additional Info folders.
Delete a Folder
To delete a folder, click on the Trash Can icon in the Actions column and follow the on-screen instructions. You cannot delete the Contact, General Info or Additional Info folders.
Automations
Trigger a Workflow When a Contact Field Is Updated
- Go to Automation > Workflows and either create a new workflow or open an existing one.
- Click Add New Trigger and select Contact Changed. In Add Filters, choose the Custom Field and complete the boxes.
- Click the + to add a new action to the workflow. From the right-hand menu, choose one or more actions to occur, such as Add a Tag, Send an Email or Add to a Workflow.
- Add any other required steps.
- Toggle on Publish and press Save.
Update Contact Field Workflow
You can update a standard field or custom field for multiple contacts based on a trigger event.
- Go to Automation > Workflows and either create a new workflow or open an existing one.
- Click Add New Trigger and select an event to trigger the rule.
- Click the + to add a new action to the workflow and select Update Contact Field from the right-hand menu. Click + Add Field and select the required field from the dropdown list. Add the value to the box.
- Press Save Action when complete.
- Add any other required steps.
- Toggle on Publish and press Save.
You can update multiple fields at the same time. Just select + Add Field again to add other fields. You can also delete fields using the trashcan icon.
Clear Contact Field Workflow
You can update a standard field or custom field for multiple contacts based on a trigger event.
- Go to Automation > Workflows and either create a new workflow or open an existing one.
- Click Add New Trigger and select an event to trigger the rule.
- Click the + to add a new action to the workflow and select Update Contact Field from the right-hand menu.
- Next select Clear Field Data from the Action Type dropdown menu. Click + Add Field and select the required field(s) from the dropdown list. Press Save Action when complete.
- Add any other required steps.
- Toggle on Publish and press Save.