
Using the Bulk Actions features in your Contacts section, you can perform multiple one-off actions to selected or all contacts. From sending an email or SMS to updating the pipeline stage and more, follow the steps below to learn how to use this feature.
Bulk Actions
Bulk Actions
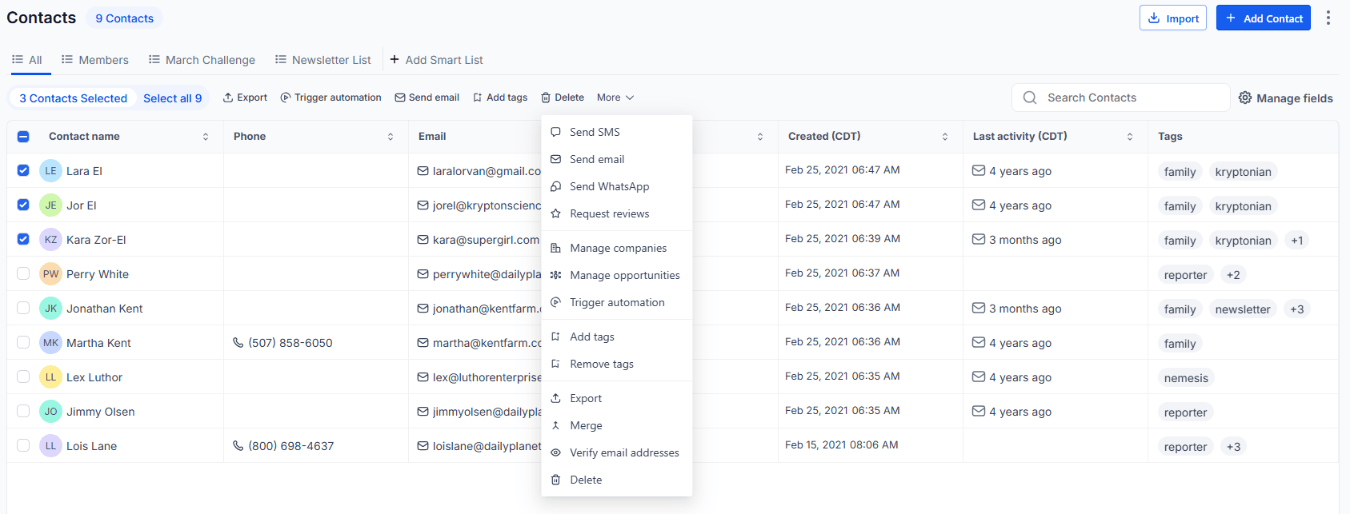
For all bulk actions, click on Contacts. Check the boxes to select required contact records. You can also check the box at the top to select all on that page, and you can click Select All to select every contact in your system.
The bulk actions menu will only appear once you have selected one or more contacts. Once selected, you will see options for Export, Trigger Automation, Send Email, Add Tags and Delete. For additional options, such as merging contacts, removing tags and sending SMS messages, click on More.
Scheduling and Action Name
Some actions run straight away. Sending emails and SMS messages, and adding contacts to a workflow, can be sent all at once, at a scheduled time, or in drip mode.
These actions also ask you for an action name. This is an internal name only. It is how you identify the action in Contacts > Bulk Actions, so give it a name you will recognise.
Note: You can schedule 25 actions, up to 720 hours (approximately 30 days) in advance. This would include scheduled campaigns.
Bulk Actions Dashboard
See Bulk Actions
To see the progress of your bulk actions, go to Contacts > Bulk Actions. You can filter by date, status, action and user.
For each action you will see the action label, the operation, the status, the user, and when it was created and completed. The Statistics column shows how the action performed, such as success and failure rates. What appears there varies with the type of action.
Change a Scheduled Action
Click the ellipsis menu (⋮) in the Actions column. For an action that is still queued, you will see View details, Pause, Cancel and Edit. For an action that has completed, you will see View details.
Email Statistics
Email Statistics
- Go to Contacts > Bulk Actions.
- Click on Show Stats in the Statistics column.
- The row will expand to show a quick overview of the emails sent. Click on the purple/blue colored number above Successful to open a popup window showing you the full statistics for that batch of emails.
- You can click on the tab at the top of the window to see a list of contacts for each statistics type. There is also an option to export that data.
Add, Delete and Restore Contacts
Add Contact
- Click on the + Add Contact button.
- Enter the contact information (such as name, email and phone number) and press Save.
- Once completed, refresh the page.
Delete a Contact
Select the required contacts, click Delete on the action bar, and follow the on-screen instructions.
Restore a Contact
- Click the ellipsis menu (⋮) in the top right corner and choose Restore.
- Select the contacts you want to restore. You can also select all.
- Press Restore.
Pipeline Change
Pipeline Change
Add/Update the Opportunity for multiple Contacts. Choose a pipeline, stage, opportunity, lead value, and more.
- Select the required contacts and click More > Manage Opportunities.
- In the window that pops up, choose a pipeline, stage, opportunity, lead value, opportunity status, and more.
- Click Add/Update Opportunity to confirm your changes.
Click here for more information about opportunities and pipelines.
Add to Workflow
Add to Workflow
Choose a workflow to bulk-add contacts into. A workflow must be published. You can change a workflow from draft to published in Automations > Workflows.
- Select the required contacts and click Trigger Automation on the action bar.
- Check the information in the pop-up and click on Ok, Proceed.
- Choose the required workflow from the dropdown list or search for the workflow by name.
- Choose the scheduling for this action. You can choose 'add all at once' to process the action immediately, 'add all at scheduled time' to process the action at one time in the future, or 'add in drip mode' to process is groups/batches.
- Add an internal reference name in the Action box and click Add to Workflow/Campaign. Press OK to close the window.
Click here for more information about workflows.
Send Text Messages and Emails
Send Email
Type out a one-time email or select from your templates.
- Select the required contacts and click Send Email on the action bar.
- Check the information in the pop-up and click on Ok, Proceed.
- In the pop-up window that appears, create your email message or choose a pre-existing template from the dropdown. Use the options on the message editor to insert custom values, format your message, add hyperlinks or trigger links, insert images, or attach files.
- Choose the scheduling for this action. You can choose 'add all at once' to process the action immediately, 'add all at scheduled time' to process the action at one time in the future, or 'add in drip mode' to process is groups/batches.
- Add an internal reference name in the Action box and click Send Email. Press OK to close the window.
Send WhatsApp
Send out a one-time WhatsApp from your templates.
- Select the required contacts and click More > Send WhatsApp.
- In the pop-up window that appears, select your WhatsApp number and template, and choose whether to Fall Back to SMS. Templates can be created in Settings > WhatApp.
- Add an internal reference name in the Action box and click Confirm to finish.
Verify Email Addresses
Verify Email Addresses
Turn Email Validation on first, in Settings > Business Profile > General. Until you do, Verify Email Addresses will not appear in the menu. Once it is on, you can validate primary email addresses for new contacts before sending the first email, and for existing contacts.
- Select the required contacts and click More > Verify Email Addresses.
- Enter a description for the action (to be shown in the tracking report).
- Click Confirm to finish.
Review Requests
Send Review Requests
Send a review request to contacts to complete a Google review or Facebook review.
- Select the required contacts and click More > Request Reviews.
- A popup window will appear, giving you a preview of the Contacts to be exported. Click Ok, Proceed.
- From the dropdown menu, select whether you want to send them an email or SMS message.
- Choose the scheduling for this action. You can choose 'add all at once' to process the action immediately, 'add all at scheduled time' to process the action at one time in the future, or 'add in drip mode' to process is groups/batches.
- Enter a description for the action (to be shown in the tracking report).
- Click Send Review Request and then press OK to close the window.
Import and Export Contacts
Export Contacts
Export a list of selected contact records from the system into a CSV file.
- Click on Columns and select all of the data types that you want to export. Only the columns you have displayed are included in the export.
- Select the required contacts and click Export on the action bar.
- A popup window will appear, giving you a preview of the Contacts to be exported.
- Click Export Contacts. The system then runs the export in the background.
- To download the file, go to Contacts > Bulk Actions and click on the download icon in the Statistics column.
To export every contact rather than a selection, click the ellipsis menu (⋮) at the top right of the Contacts page and choose Export.
Import Contacts
Importing is not a bulk action and does not need anything selected. Import is a button at the top right of the Contacts page, beside Add Contact.
- Click Import at the top right.
- A popup window will appear. To upload a CSV file, click Select File or drag-and-drop the list.
- Map the fields (such as first name, surname, and email) to your CSV columns. Click Continue.
- Check the field mapping preview and confirm mappings. Click Continue.
- Select duplicate strategy (how you would like to handle any duplicates). Click Continue.
- Add additional tags and click Done. Do NOT click out of the screen while the import is happening.
- Once completed, refresh the page to check that the list of contacts was successfully imported.
Click here for full details about how to import contacts.
Merging Contacts
Merge Contacts
Click here for more information about merging contacts and finding duplicates.
Scheduling Note
When scheduling a bulk action in drip mode, the 'repeat after' does not repeat the entire process. Instead, it can be viewed as 'run every'.
For example, you could choose to add 100 contacts every 5 hours. If you had 780 contacts selected, there would be a total of 8 batches (7 x 100 and 1 x 80). This process would repeat until all selected contacts received the drip communication.